You've installed the latest version of Git, read some tutorials and have been merrily branching, commiting and having a jolly old time enjoying the freedom that Git gives you. At some point Git "clicked", and you picked up your laptop to show a co-worker how bad ass this new thing you did was; It was probably when you did your first reintegration merge without angering the gods.
Yet, with all the power that Git bestows, you're still missing out. Let's face it, Git is cool. But if you're using the default command line environment on Windows, it feels a bit... meh.
So what are we missing? Consider for a moment...
- Out of the box, you can use Git Bash or cmd.exe (not great options imo)
- You have no "real" ability to customize cmd.exe
- Scripting is horrible (by today's standards)
- Out of the box you can use Powershell, but without customization you're really only getting a nicer shell
To get past the limitations of the default command line experience, we're going to set a few things up that make Powershell shine when working with Git.
Install Git
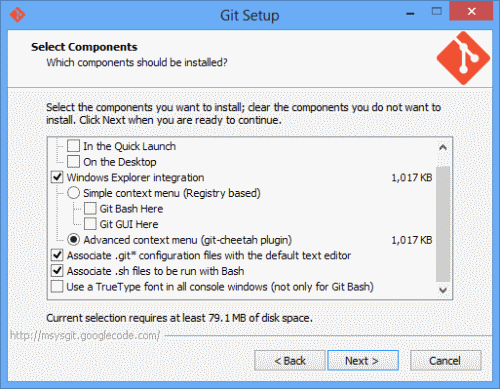
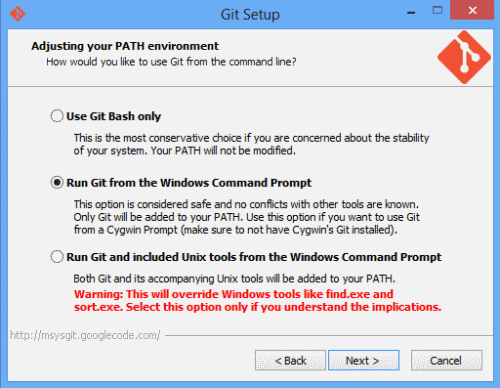
If you already have Git installed and have been using it via the command line, you can likely skip this entire step. If not, and this is your first foray into using Git from the command line, take a moment to install Git so that it will play nice with Powershell. Download the latest version of git for windows and follow the installation process. As you go, make sure that you select "Run Git from the Windows Command Prompt" so your PATH is updated and Powershell knows what "git" means.
While you're at it, you'll also want to tell Git to use OpenSSH for SSH (more on this later).
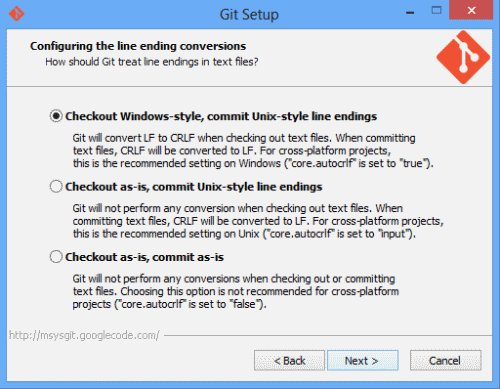
For reference, this is what I selected when upgrading to the latest version of Git.


Now that you have Git installed, let's install Posh-Git, Console2, and set up credential caching.
Install Posh-Git
If you take a close look at the command prompt at the top of this post, you'll notice something interesting; an extended, dynamic command prompt that looks something like...

In this example, the prompt shows us that we're on the Master branch, we have no new files, one changed file, and no deleted files and that these files are not staged for commit. If I were to add this change to the staging area (with git add), I'll get:

Notice that we have the same information being displayed; the name of the branch and number of added, modified and deleted files, but in this case Posh-Git shows this information in green to show that this these files are now in the staging area and ready to be commited.
The installation of Posh-Git couldn't be easier, and I highly recommend first installing PsGet and using it to install the latest version of Posh. Think of PsGet as a package manager for Powershell modules, and you'll have a good idea of what it can do for you.
To get started, open your Powershell environment and run the following command:
(new-object Net.WebClient).DownloadString("http://psget.net/GetPsGet.ps1") | iex
Once PsGet tells you that it's finished installing, you'll install the latest version of Posh-Git by executing this command:
Install-Module Posh-Git –force
Note that adding the -force argument to the Install-Module command tells PsGet to either install Posh-Git or update it to the latest version. As a matter of habit, I always add -force to update Posh to the latest version.
If you'd like to check out how Posh-Git works, you can always perform a source code installation by forking or cloning the repository from Github and following the instructions to install Posh-Git. Otherwise, stick with the PsGet install and you'll be good to go.
Now that you've got a bad ass custom Posh-Git powered Powershell prompt (10 times fast anyone?), let's round out the shell enhancements with Console2.
Install Console2
Console2 is a nifty little program that wraps Powershell, cmd.exe or any other shell you may use in a nice, shiny, configurable package. I was introduced to it several years back by Scott Hanselman and I have used it every day since. Scott has an excellent writeup on how he configures Console2, which influenced to a very strong degree the configuration that I use today. Follow his directions, and tweak as you see fit.
Now that our shell is in excellent shape, let's turn our attention to caching those pesky credentials.
Cache Your SSH Keys
After you installed Posh-Git and restarted your Powershell environment, you probably got a warning that looked something like:

The default profile for Posh-Git is trying to start ssh-agent.exe, but our shell environment doesn't know where to go to start it. To fix this, open the profile (mine is located at C:\Users\jgall\Documents\WindowsPowerShell\Microsoft.PowerShell_profile.ps1) with your favorite text editor, and add the following to the top of the file:
$env:path += ";" + (Get-Item "Env:ProgramFiles(x86)").Value + "\Git\bin"
When you're done, your profile should look very similar to this:

Where the line 1 adds ssh-agents' path to the Powershell PATH environment variable, and line 4 points to the location of the Posh-Git default profile. In my case, the machine that I created this screen grab from installed Posh-Git by using source code, before I knew about the PsGet option (thanks Phil Haack)
Finally, you'll want to create an SSH key and add it to your Github/Bitbucket/Whatever account.
Now that you've got ssh-agent running and an SSH key configured, close and re-open Powershell or execute the Powershell command `. $PROFILE' and you should get a prompt that looks something like this:

Cache Your HTTPS Credentials
If you're using HTTPS to communicate with your remotes, you're probably tired of entering your password all the time. Let's install credential helper to cache your credentials so you only have to enter it once when you launch powershell.
After you install this utility, send Andrew Nurse a note and thank him for writing credential helper.
Write Some Scripts
Now that your Git Powershell environment is all pimped out, write (or find) some scripts to automate the more tedious Git things you find yourself doing. For example, I'm super paranoid about having the latest version of everything in my private corporate Github repositories on my local machine, so I wrote a simple script that will iterate the repositories for a given folder and fetch the latest source.
$global:GitAllSettings = New-Object PSObject -Property @{
	FolderForegroundColor       = [ConsoleColor]::Cyan
}

function git-all()
{
	$s = $global:GitAllSettings
	dir -r -i .git -fo | % {
		pushd $_.fullname
		cd ..
		write-host -fore $s.FolderForegroundColor (get-location).Path
		git-fetchall
		popd
	}
}

function git-fetchall()
{
	$remotes = git remote
	if($remotes){
		$remotes | foreach {
			Write-Host 'Fetching from' $_
			git fetch $_
		}
	}else{
		Write-Host 'No remotes for this repository'
	}
	git status
}

[System.Reflection.Assembly]::LoadWithPartialName("System.Diagnostics")

$sw = new-object system.diagnostics.stopwatch
$sw.Start()

git-all

$sw.Stop()
Write-Host "Completed in " $sw.Elapsed
Put this script somewhere on your machine and run it in the folder where your Git repositories are. While you're off getting fresh coffee, it will iterate each repository it finds and attempt to Fetch from each remote you have configured. Sweet huh?